
























Manage Catering in Your Merchant Dashboard
We’ve updated Catering to make setup and management simpler and fully integrated with your existing ordering flow. Instead of managing Catering as a completely separate experience, catering items now live directly inside your regular menu across Web Ordering and Mobile.
What changed
With the updated Catering experience:
- Catering items now live inside your regular menu
- No separate catering menu or URL is required
- Catering uses the same prep time system as regular ordering
- Delivery settings can be configured separately for catering
- Catering hours can be managed independently by location
- Customers can schedule catering orders in advance
- Guest checkout can be enabled for catering orders
- Catering menus can now be displayed either as part of your regular menu or as a separate Catering experience
- Catering items require an active Catering location configuration to display correctly
Still require support?
Contact support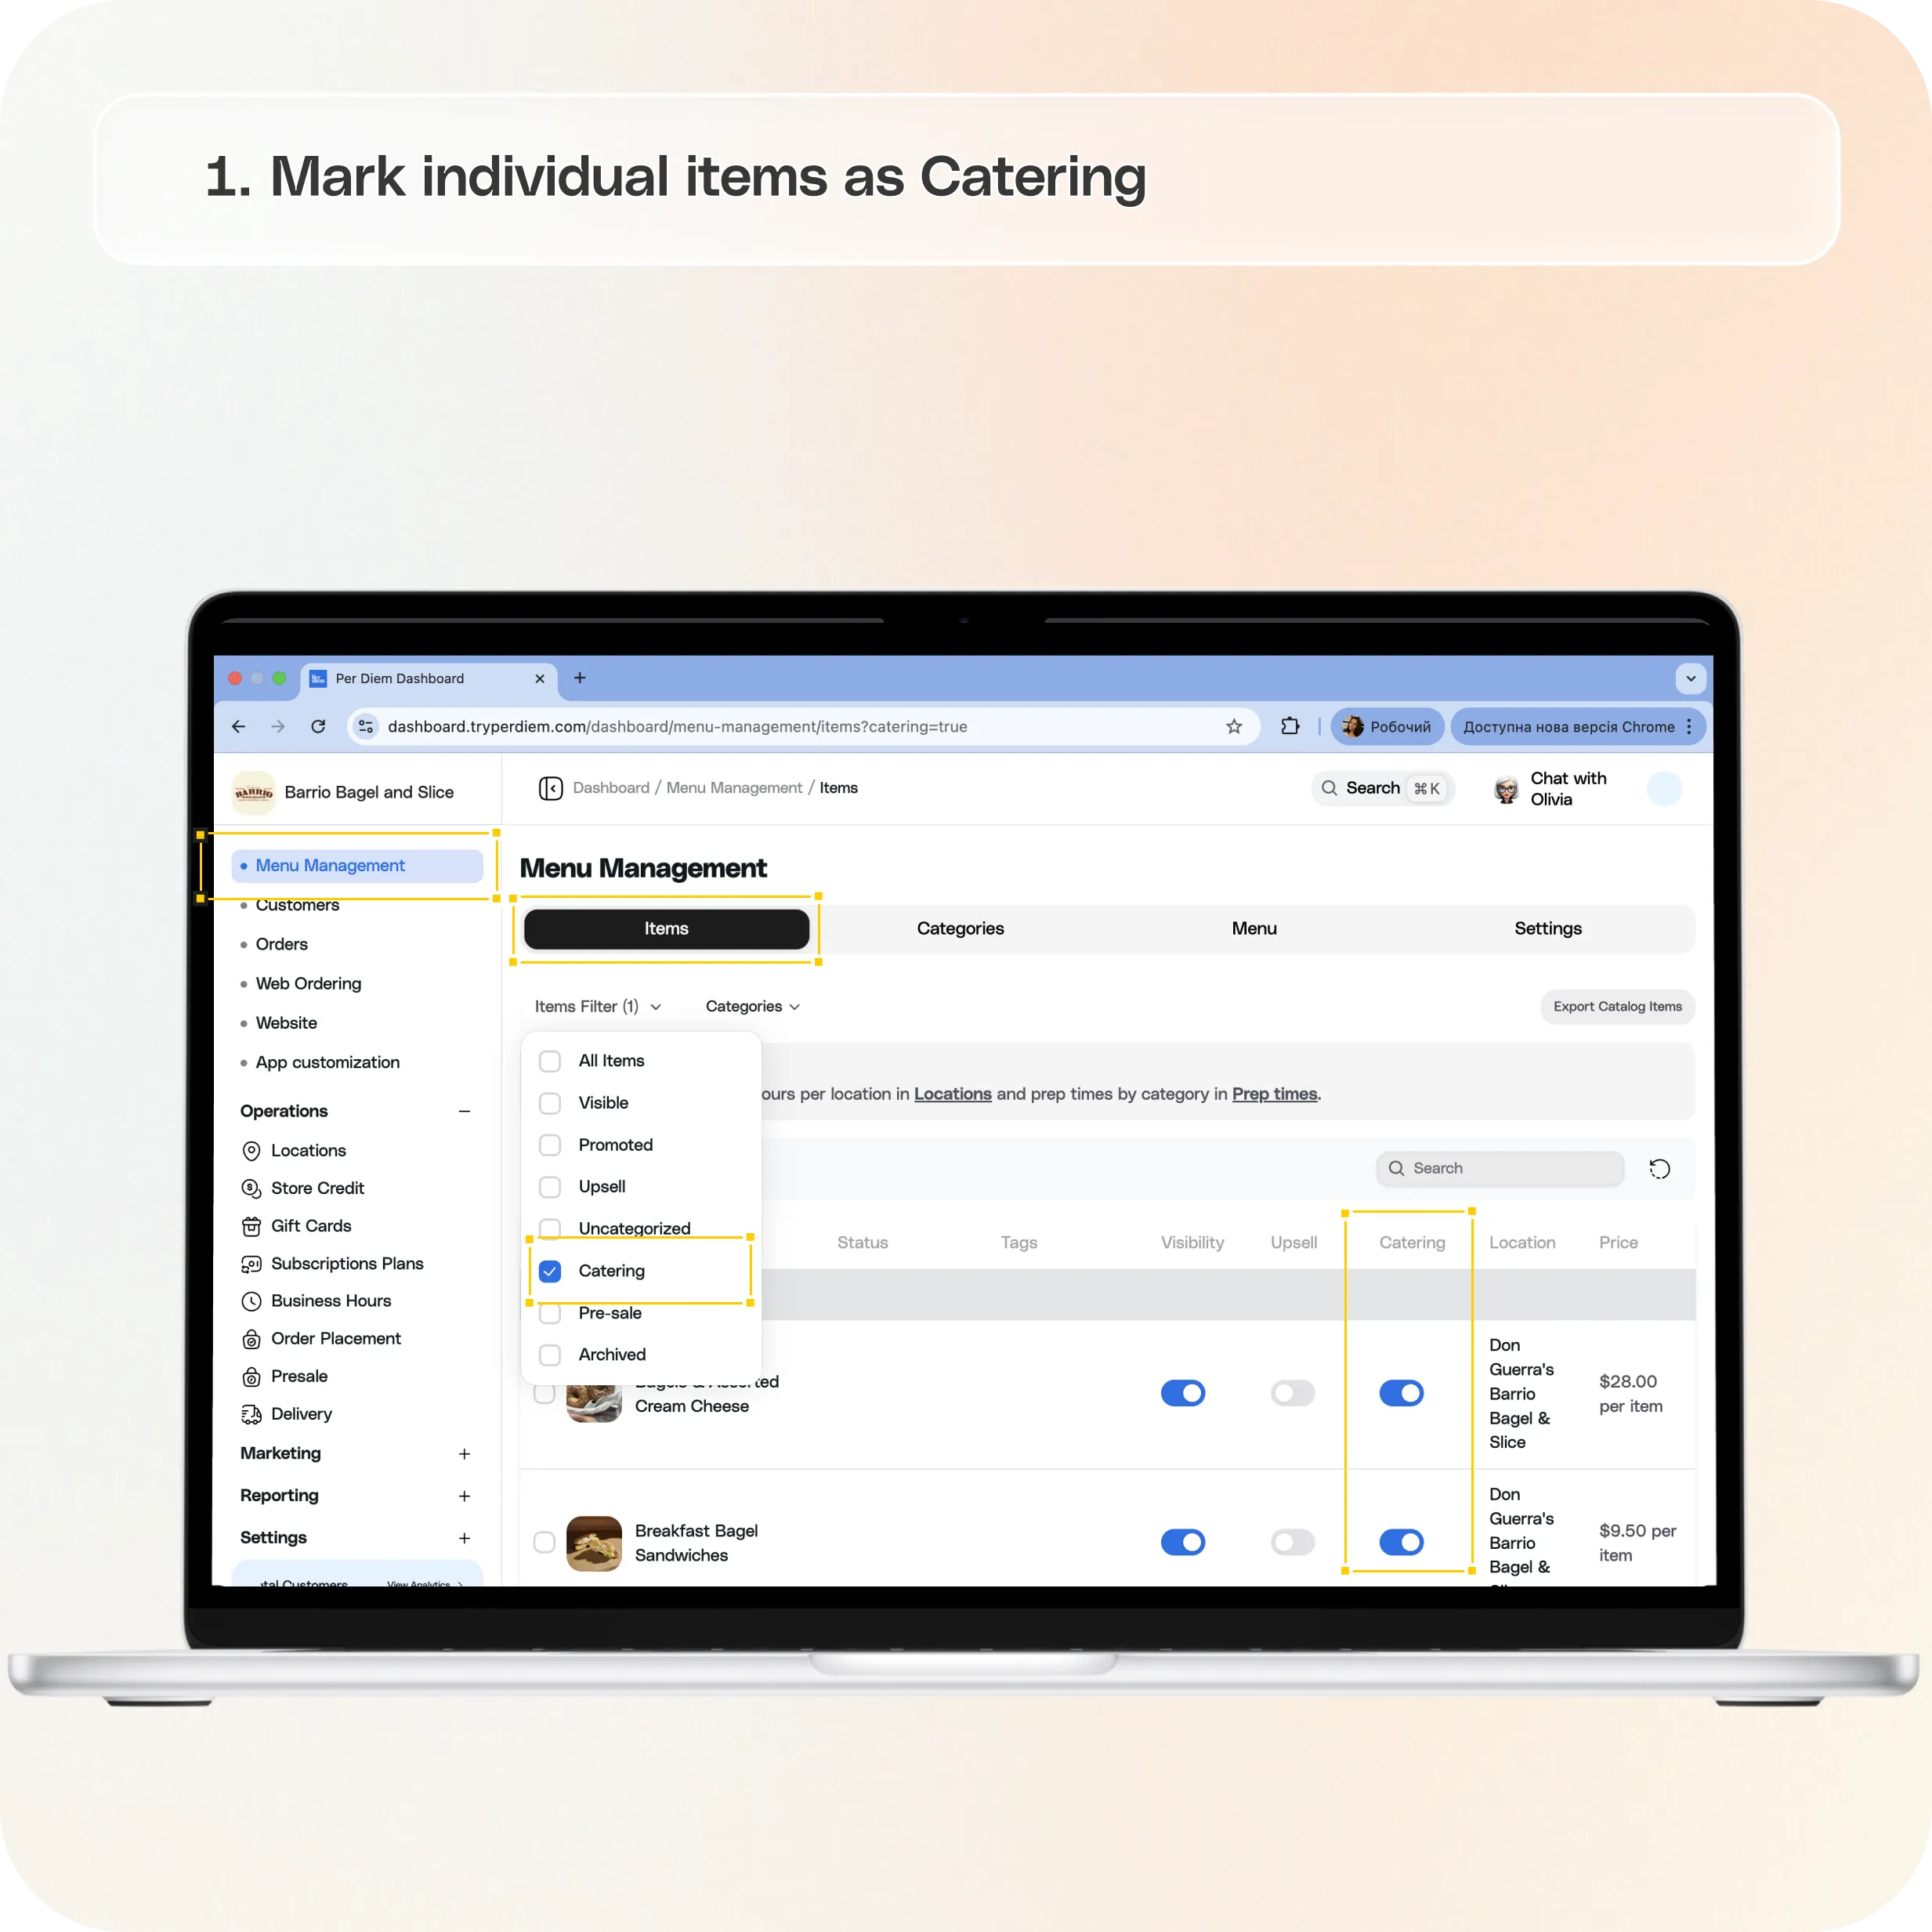
Mark Items or Categories as Catering
To make items available for catering, you can enable Catering at either the item or category level.
After marking items or categories as Catering, you must also enable Catering at the location level.
If Catering items are enabled but the location does not have Catering enabled, Catering items may not appear correctly, and your menu may disappear from the customer experience.
Option 1: Mark individual items as Catering
**Go to:**
Merchant Dashboard → Menu Management → Items
Step 1: Open Items
Navigate to Menu Management → Items
Step 2: Filter by Catering
Use the Catering filter
Step 3: Toggle items
Turn the Catering toggle ON for individual items you want available for catering.
Step 4: Save your changes
Click Save
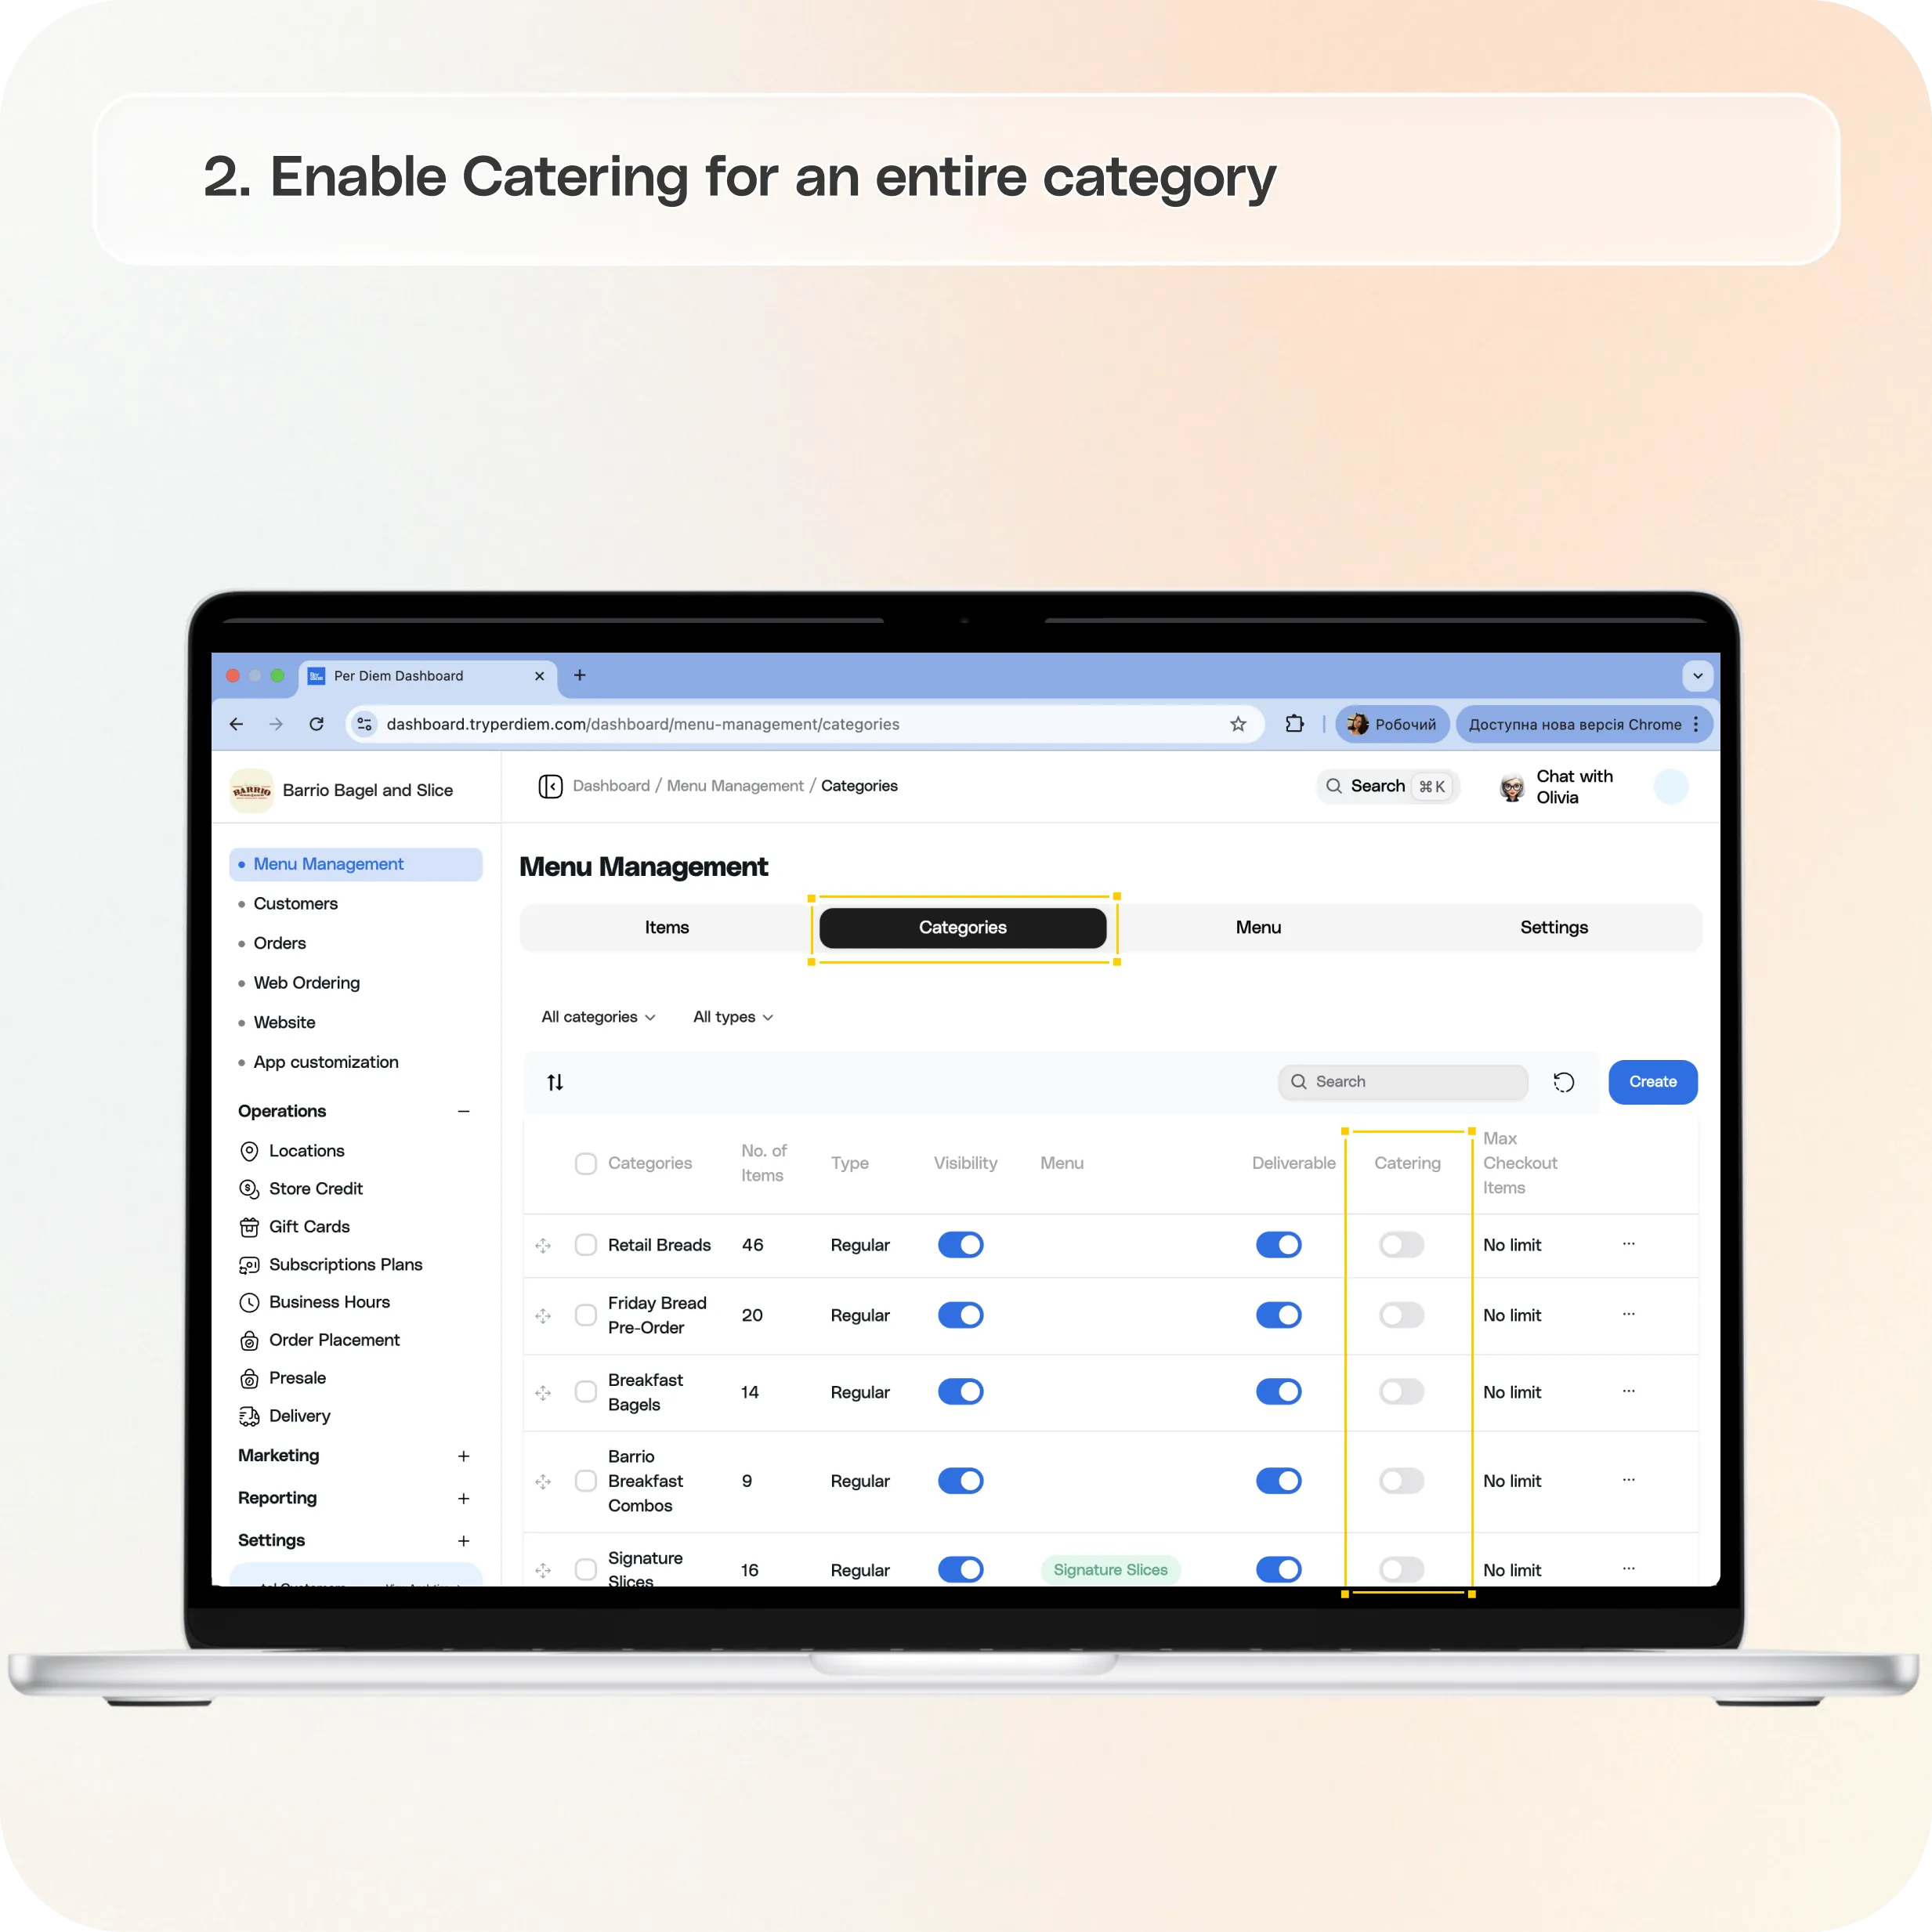
Option 2: Enable Catering for an entire category
If you want all items inside a category to be available for Catering:
**Go to:**
Merchant Dashboard → Menu Management → Categories
Step 1: Open Categories
Navigate to Menu Management → Categories
Step 2: Enable Catering
Turn ON the Catering toggle for a category.
This automatically applies Catering to all items in that category.
Step 3: Save your changes
Click Save
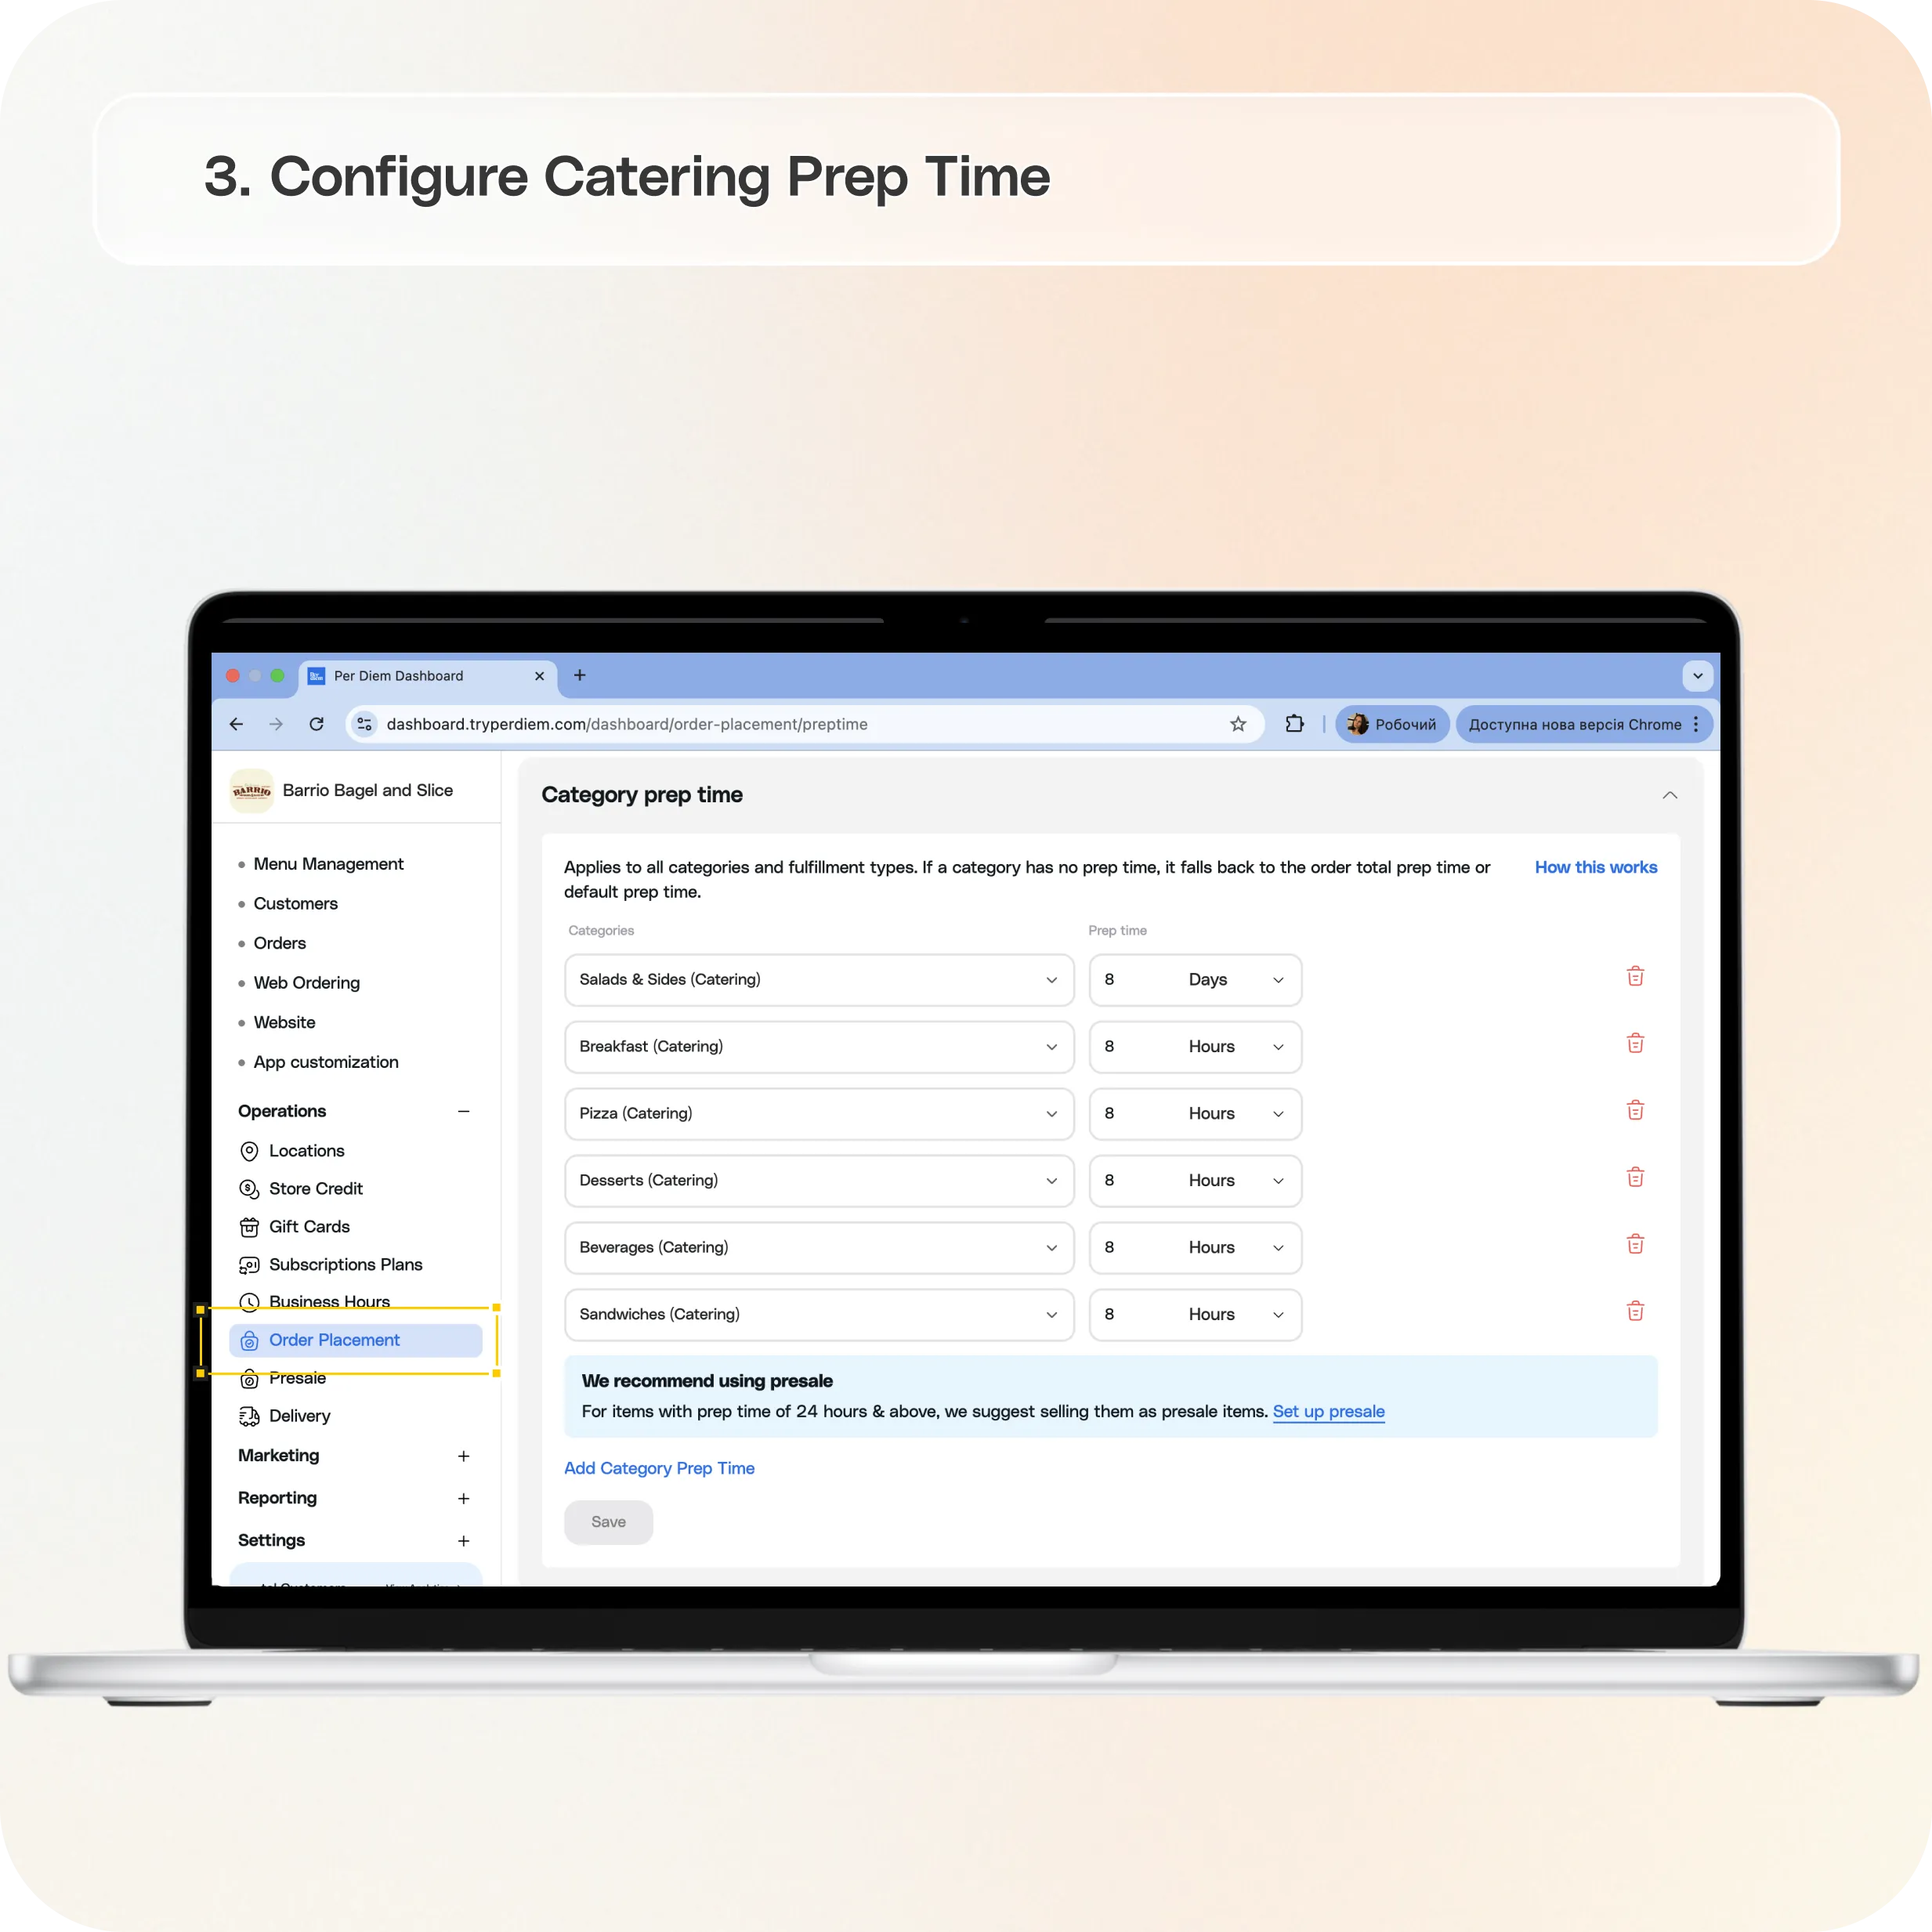
Configure Catering Prep Time
Catering now follows the same prep time logic as regular ordering.
This allows you to require more advance notice for larger or more complex catering orders.
Go to:
Operations → Order Placement → Prep Times → Category Prep Time
How to configure Catering prep times
Step 1: Add a category prep rule
Click Add Category Prep Time
Step 2: Select catering categories
Choose categories used for Catering, such as:
- Platters
- Trays
- Bulk Orders
Step 3: Assign prep time
Enter prep time and select a time unit.
Longer prep times require customers to place orders further in advance.
Step 4: Save your changes
Click Save
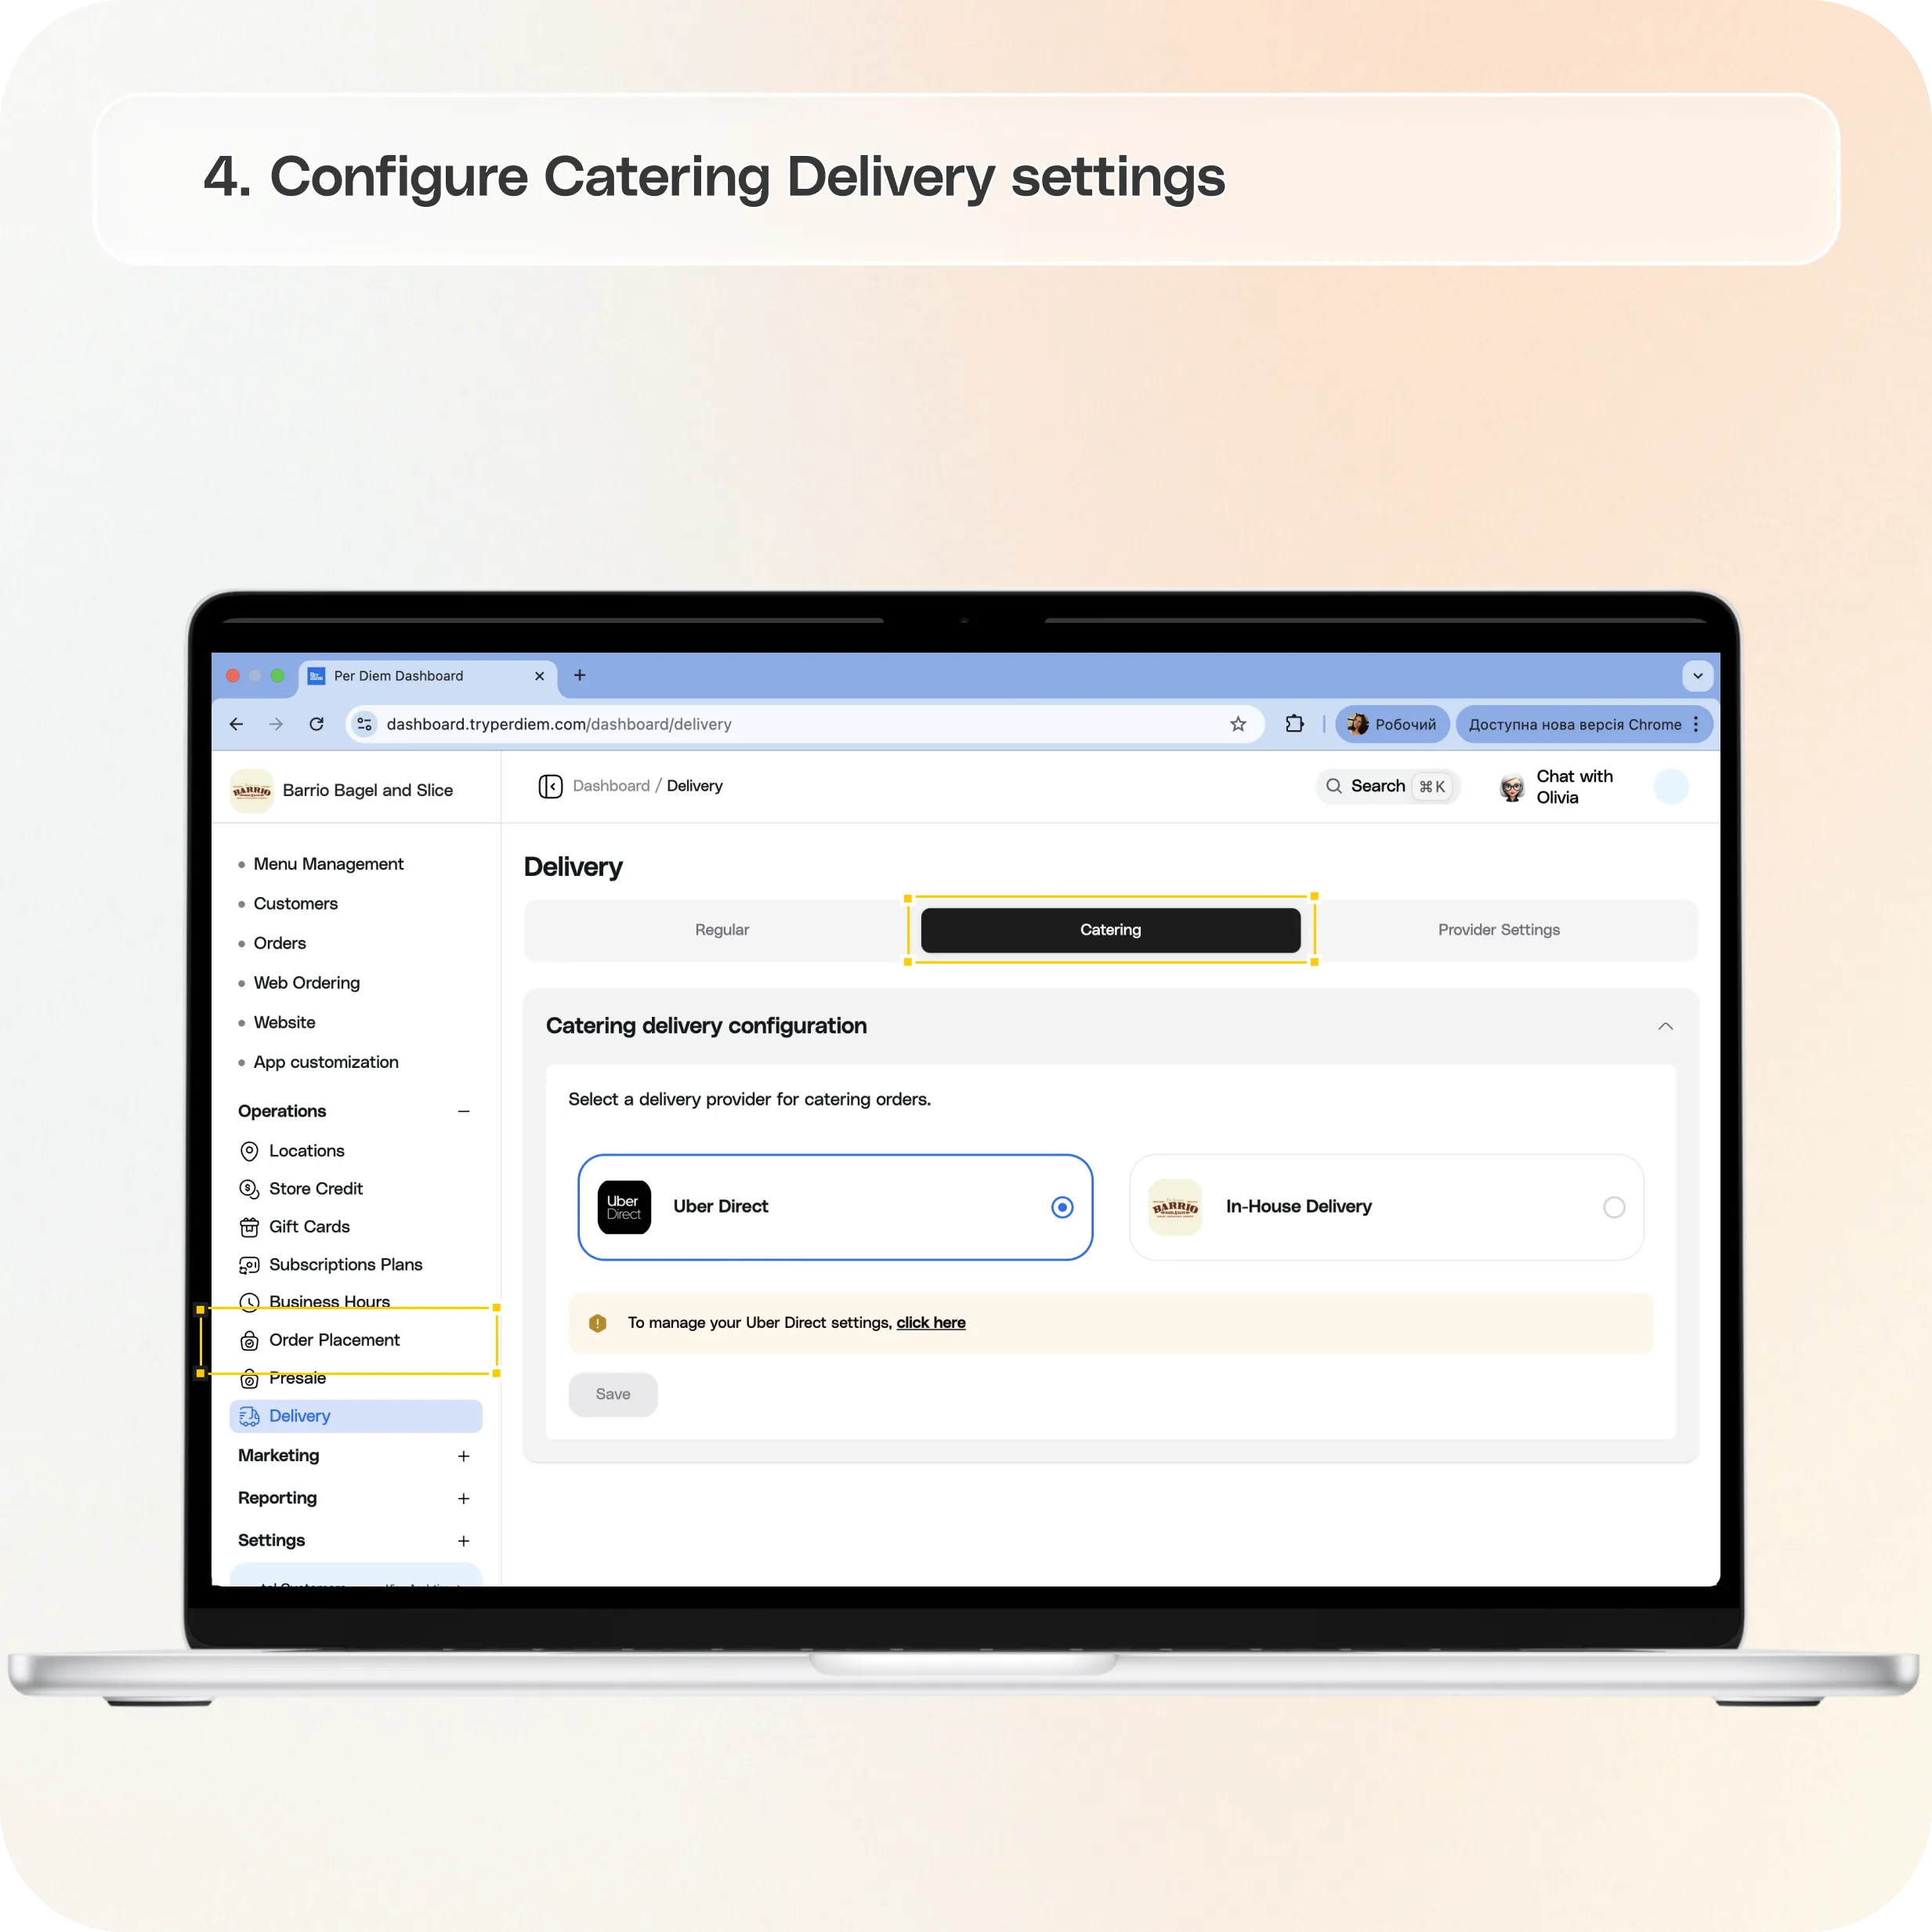
Configure Catering Delivery Settings
Catering delivery can now be managed independently from regular delivery.
Go to:
Operations → Delivery → Catering
You can customize:
- Delivery radius
- Minimum order amount
- Delivery fee structure
These settings apply only to Catering orders.
Step 1: Update delivery settings
Adjust your Catering delivery preferences.
Step 2: Save changes
Click Save
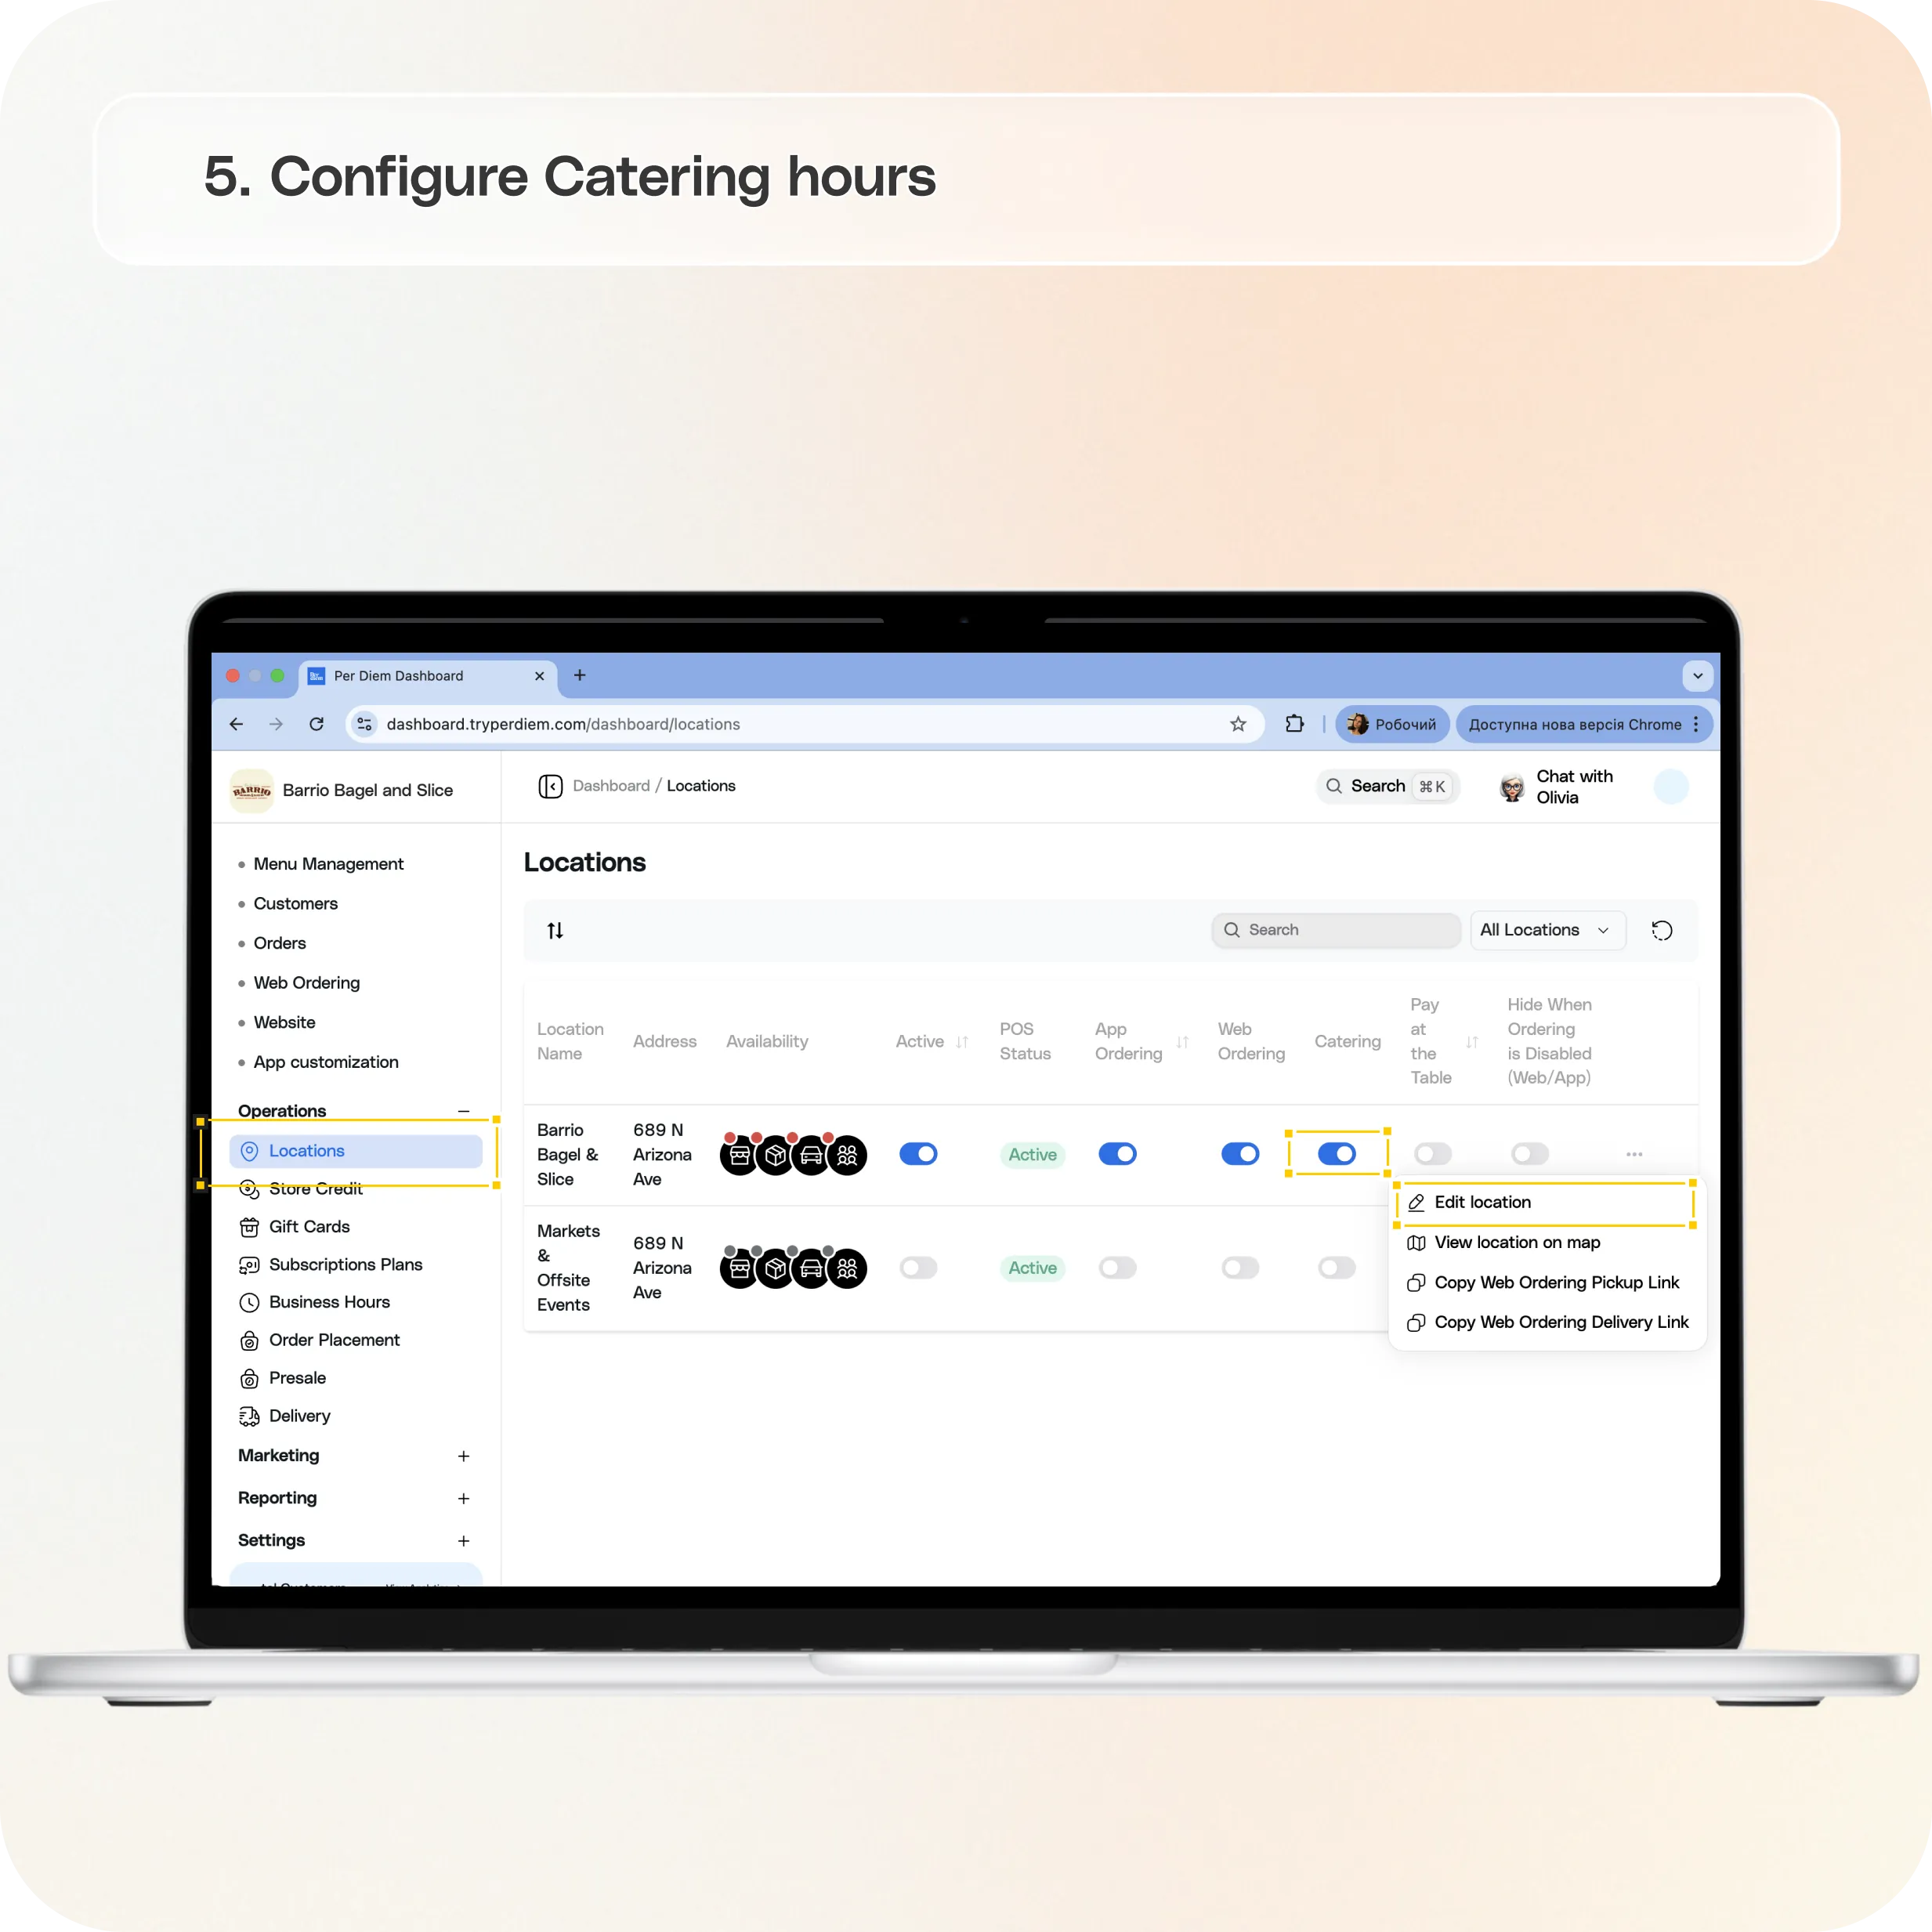
Configure Catering Hours
Catering operating hours can now be managed separately for each location.
Go to:
Locations → Select Location → Catering Accordion
How to set Catering hours
Step 1: Open location settings
Select the location you want to update.
Step 2: Open Catering settings
Expand the Catering accordion
Step 3: Configure settings
Set:
- Catering operating hours
- Calendar invite email settings
Step 4: Save changes
Click Save
Enable Catering Guest Checkout
You can allow customers to place Catering orders without creating an account.
Go to:
Settings → App Features → Order Preference
How to enable Guest Checkout
Step 1: Open Order Preference settings
Navigate to:
Settings → App Features → Order Preference
Step 2: Enable Catering Guest Checkout
Turn ON the Catering Guest Checkout option.
Step 3: Save your changes
Click Save
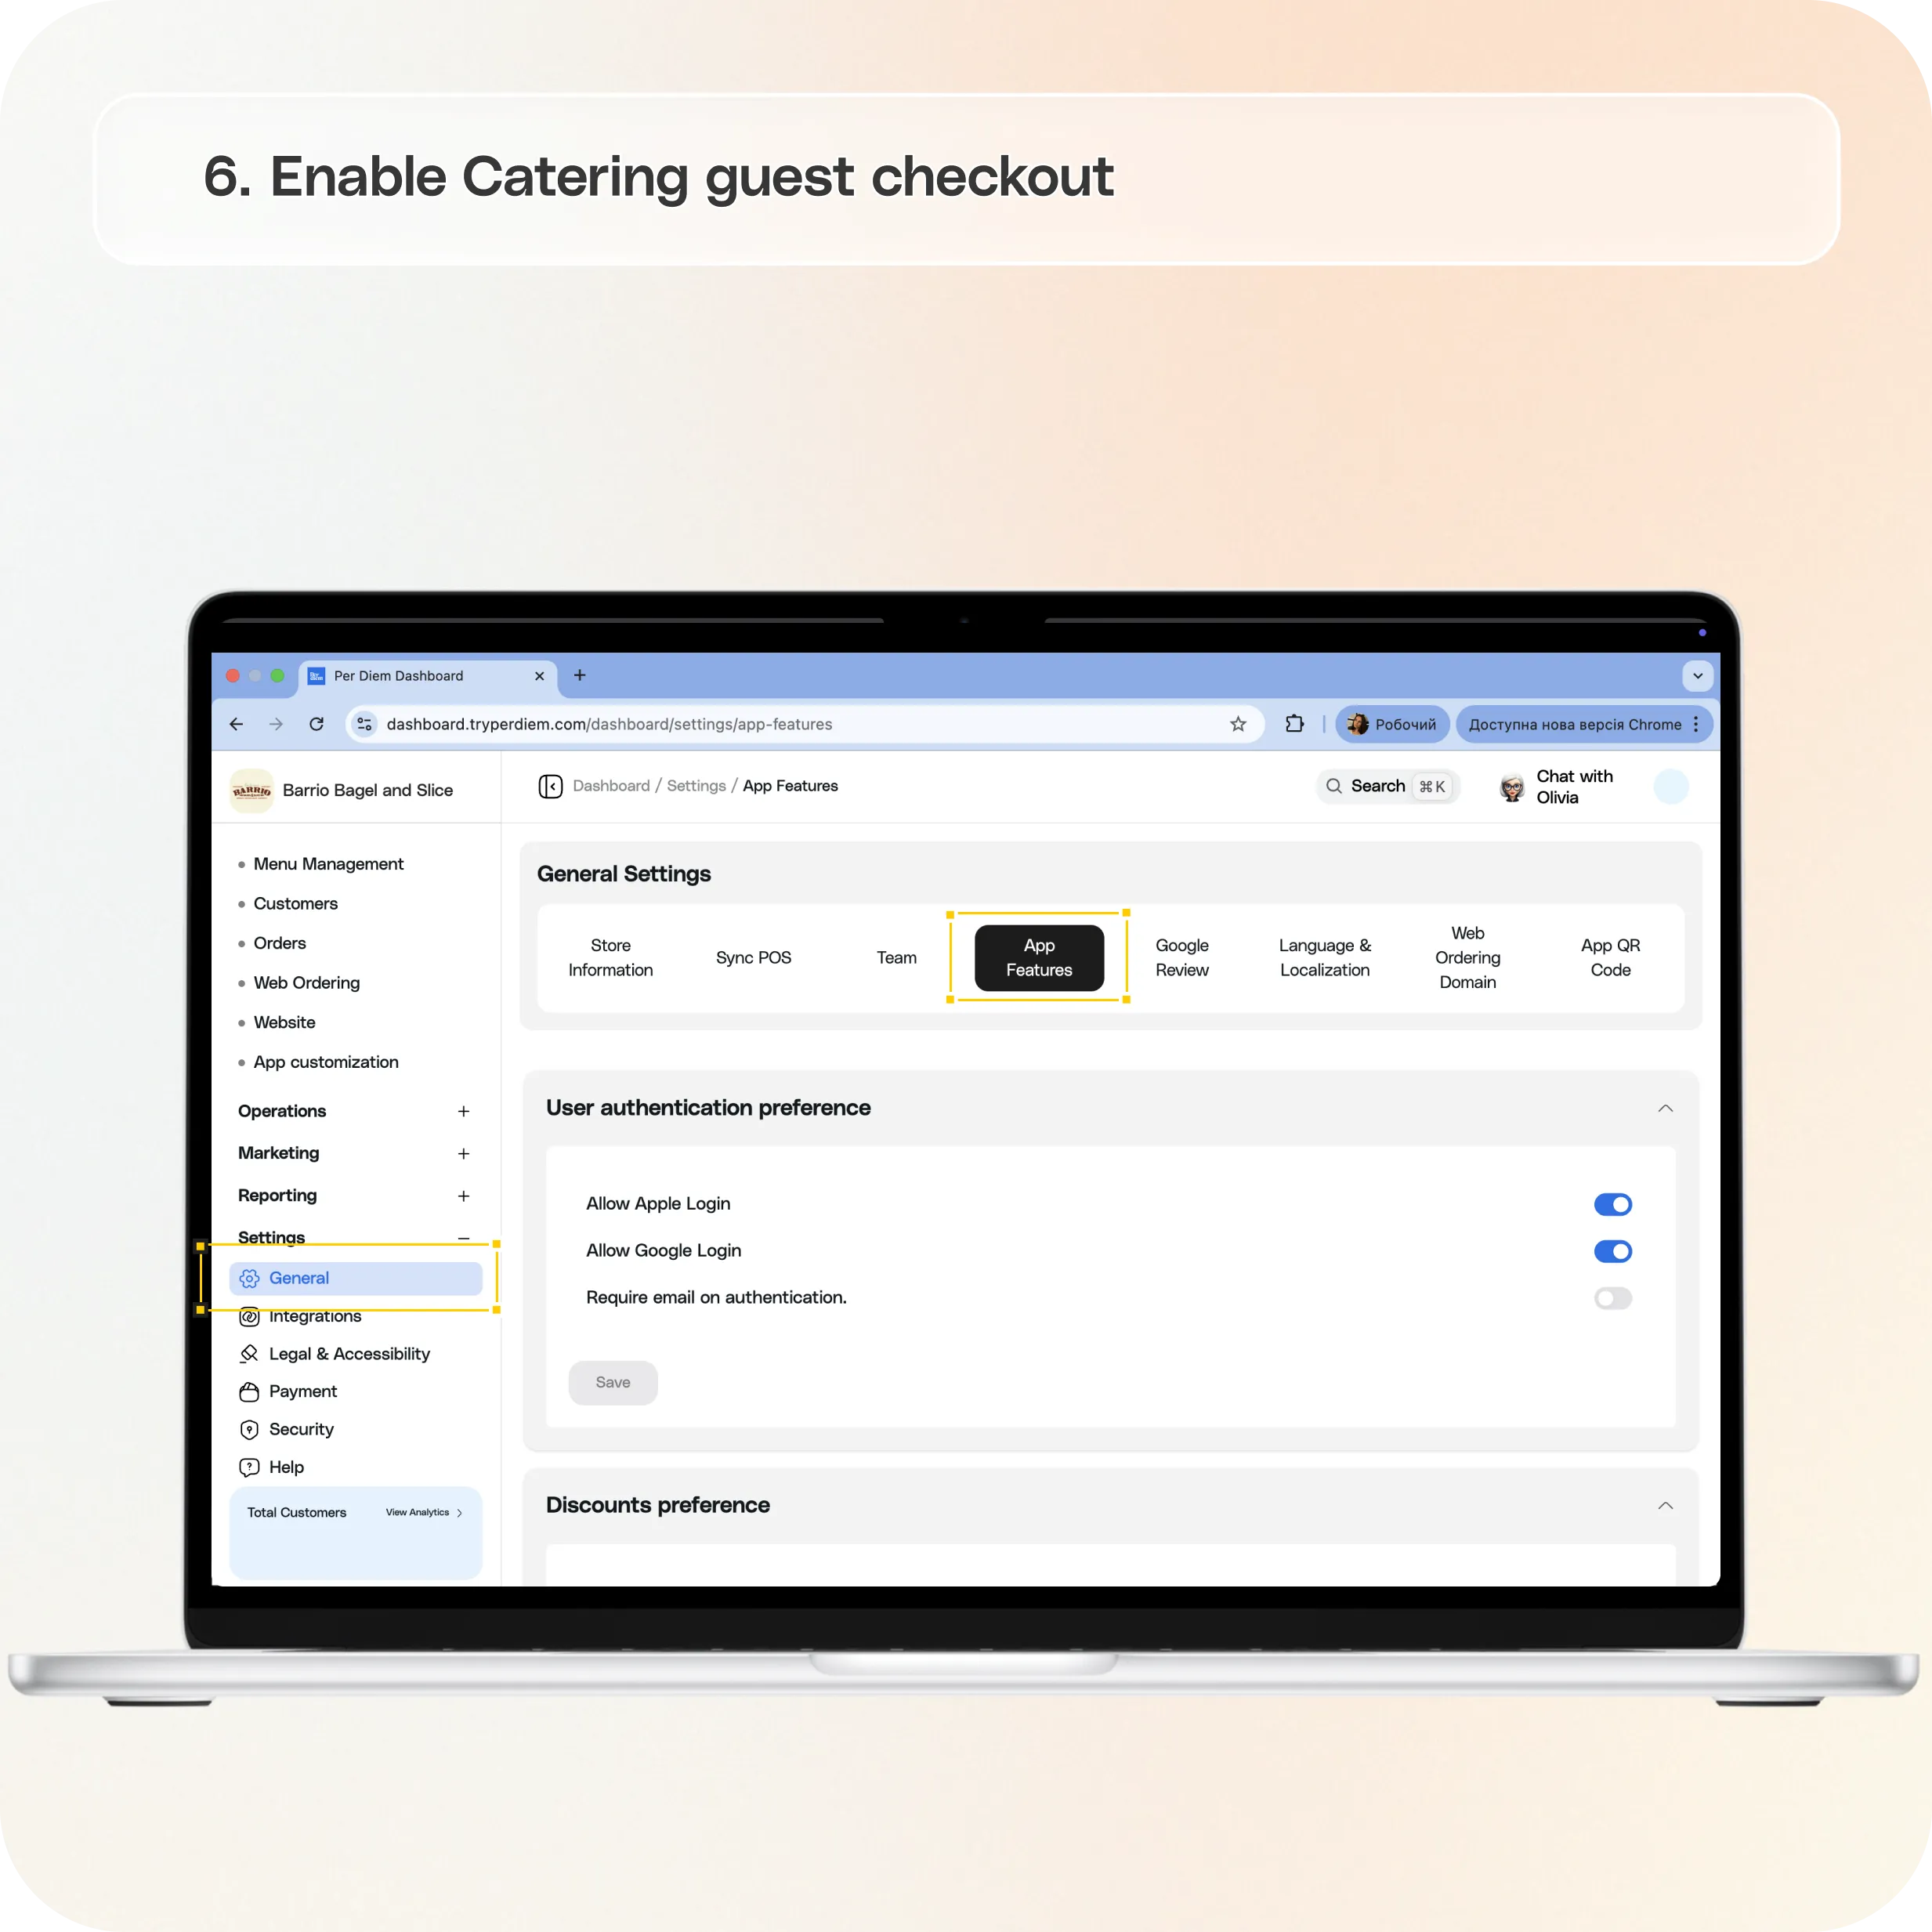
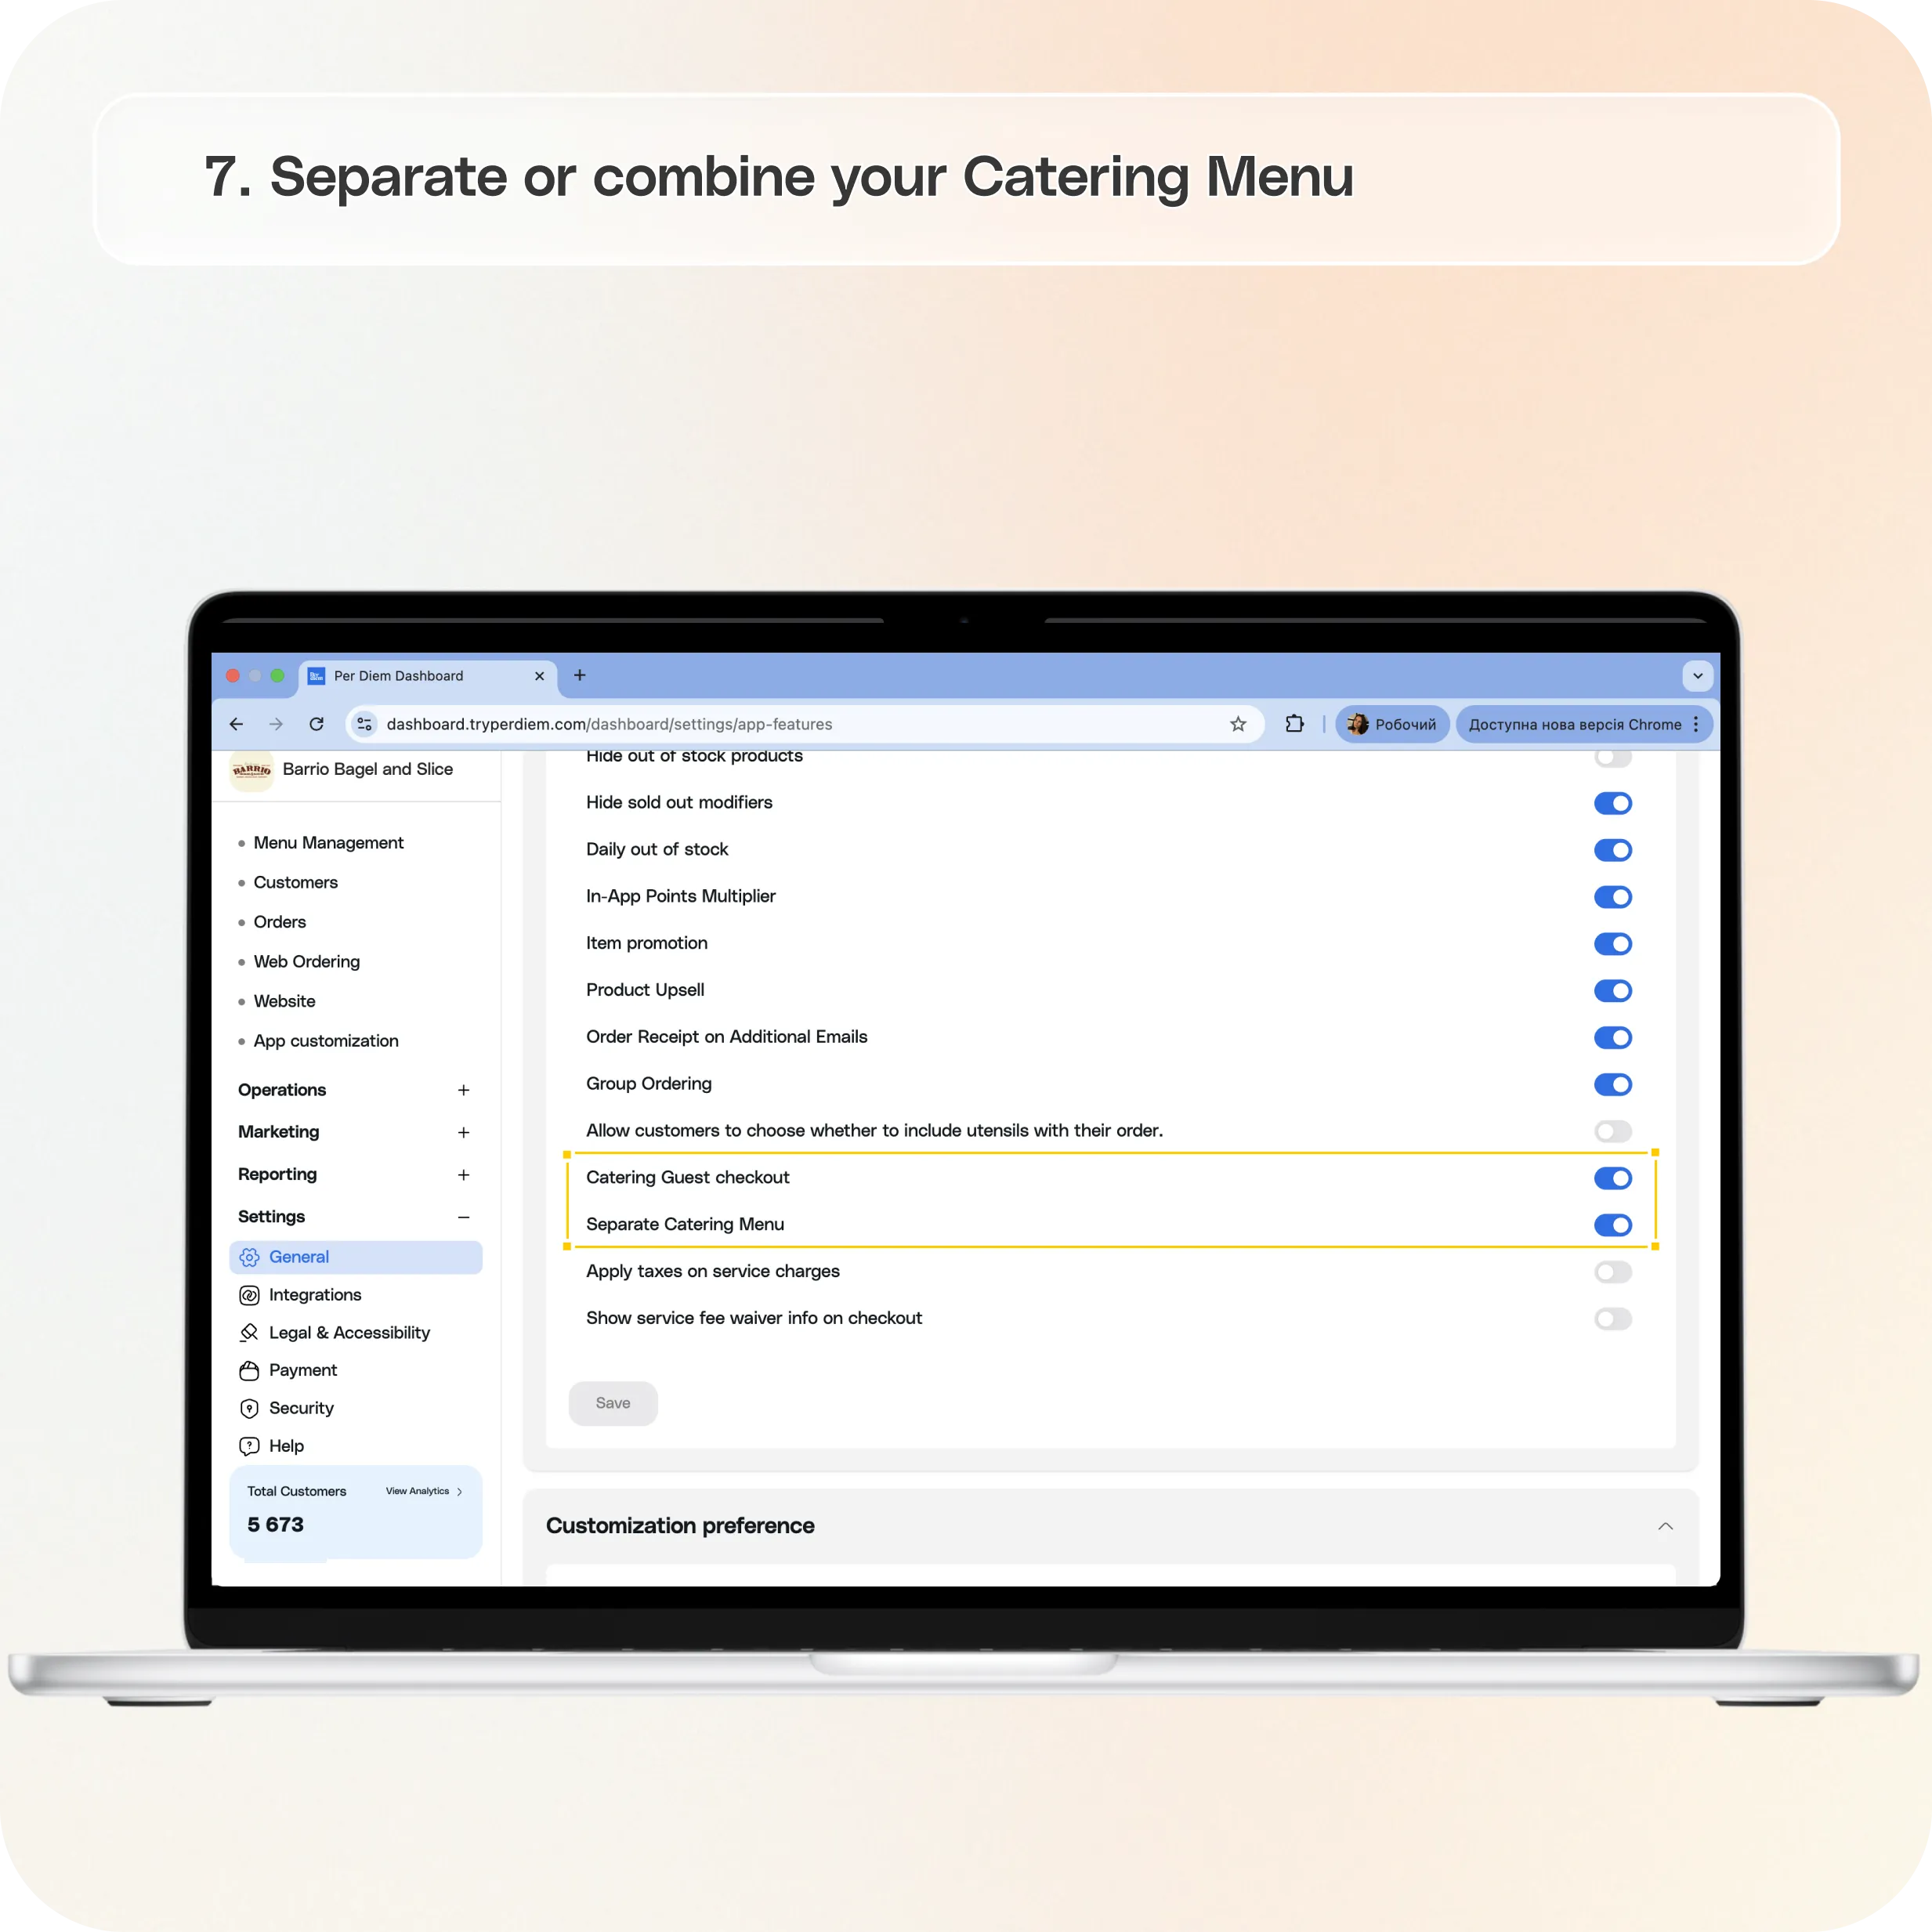
Separate or Combine Your Catering Menu
You can choose whether Catering appears inside your regular ordering flow or as a separate Catering experience.
Go to:
Settings → General → App Features
Open the App Features tab.
Step 1: Locate Separate Catering Menu
Find the Separate Catering Menu feature.
Step 2: Turn the feature ON or OFF
- Turn ON to create a separate Catering experience with separate carts
- Turn OFF to keep Catering integrated into your regular menu flow
**
Customer Experience Updates**
Web Ordering
Customers will now see:
- Catering items directly inside the regular menu
- A blue CATERING ONLY badge on catering items
- A Catering filter pill for viewing catering items only
No separate Catering URL is needed.
Mobile App
Customers will now see:
- Catering badges on catering items
- A dedicated Catering tab in horizontal category navigation
- Filtering for Catering only items
Scheduled Catering Orders
Customers can:
- Schedule catering orders for a future date and time
- Automatically follow prep time rules configured for Catering categories
Prep time requirements determine how far in advance Catering orders can be placed.
Still have questions?Contact us
Ask anything or just say hi